Kargo Quickstart
This guide presents a basic introduction to Kargo. Together, we will:
-
Install Kargo and its dependencies into an existing, local Kubernetes cluster.
OR
Create a new local Kubernetes cluster with Kargo and its dependencies already installed.
-
Demonstrate how Kargo can progress changes through multiple stages by interacting with your GitOps repository and Argo CD
Applicationresources. -
Clean up.
If you're looking to contribute to Kargo, you may wish to consult the contributor guide instead.
Starting a Local Cluster
Any of the following approaches require Helm v3.13.1 or greater to be installed.
- Docker Desktop
- OrbStack
- kind
- k3d
- More Info
If you are a Docker Desktop user, you can follow these instructions to enable its built-in Kubernetes support.
Although this is one of the fastest paths to a local Kubernetes cluster, be aware that Docker Desktop supports only a single Kubernetes cluster. If that cluster reaches a state you are dissatisfied with, resetting it will remove not just Kargo-related resources, but all your workloads and data.
curl -L https://raw.githubusercontent.com/akuity/kargo/main/hack/quickstart/install.sh | sh
OrbStack is a fast, lightweight, drop-in replacement for Docker Desktop for Mac OS only. You can follow these instructions to enable its built-in Kubernetes support.
Although this is one of the fastest paths to a local Kubernetes cluster, be aware that OrbStack supports only a single Kubernetes cluster. If that cluster reaches a state you are dissatisfied with, resetting it will remove not just Kargo-related resources, but all your workloads and data.
curl -L https://raw.githubusercontent.com/akuity/kargo/main/hack/quickstart/install.sh | sh
If you have any Docker-compatible container runtime installed (including native Docker, Docker Desktop, or OrbStack), you can easily launch a disposable cluster just for this quickstart using kind.
curl -L https://raw.githubusercontent.com/akuity/kargo/main/hack/quickstart/kind.sh | sh
While this option is a bit more complex than using Docker Desktop or OrbStack directly, it offers the advantage of being fully-disposable. If your cluster reaches a state you are dissatisfied with, you can simply destroy it and launch a new one.
If you have any Docker-compatible container runtime installed (including native Docker, Docker Desktop, or OrbStack), you can easily launch a disposable cluster just for this quickstart using k3d.
curl -L https://raw.githubusercontent.com/akuity/kargo/main/hack/quickstart/k3d.sh | sh
While this option is a bit more complex than using Docker Desktop or OrbStack directly, it offers the advantage of being fully-disposable. If your cluster reaches a state you are dissatisfied with, you can simply destroy it and launch a new one.
If you are averse to piping a downloaded script directly into a shell, please feel free to download the applicable script and inspect its contents prior to execution.
Any approach you select should only:
- Launch a new, local Kubernetes cluster, if applicable
- Install cert-manager
- Install Argo CD
- Install Argo Rollouts
- Install Kargo
If Kargo installation fails with a 401, verify that you are using Helm v3.13.1
or greater.
If Kargo installation fails with a 403, it is likely that Docker is configured
to authenticate to ghcr.io with an expired token. The Kargo chart and images
are accessible anonymously, so this issue can be resolved simply by logging out:
docker logout ghcr.io
At the end of this process:
-
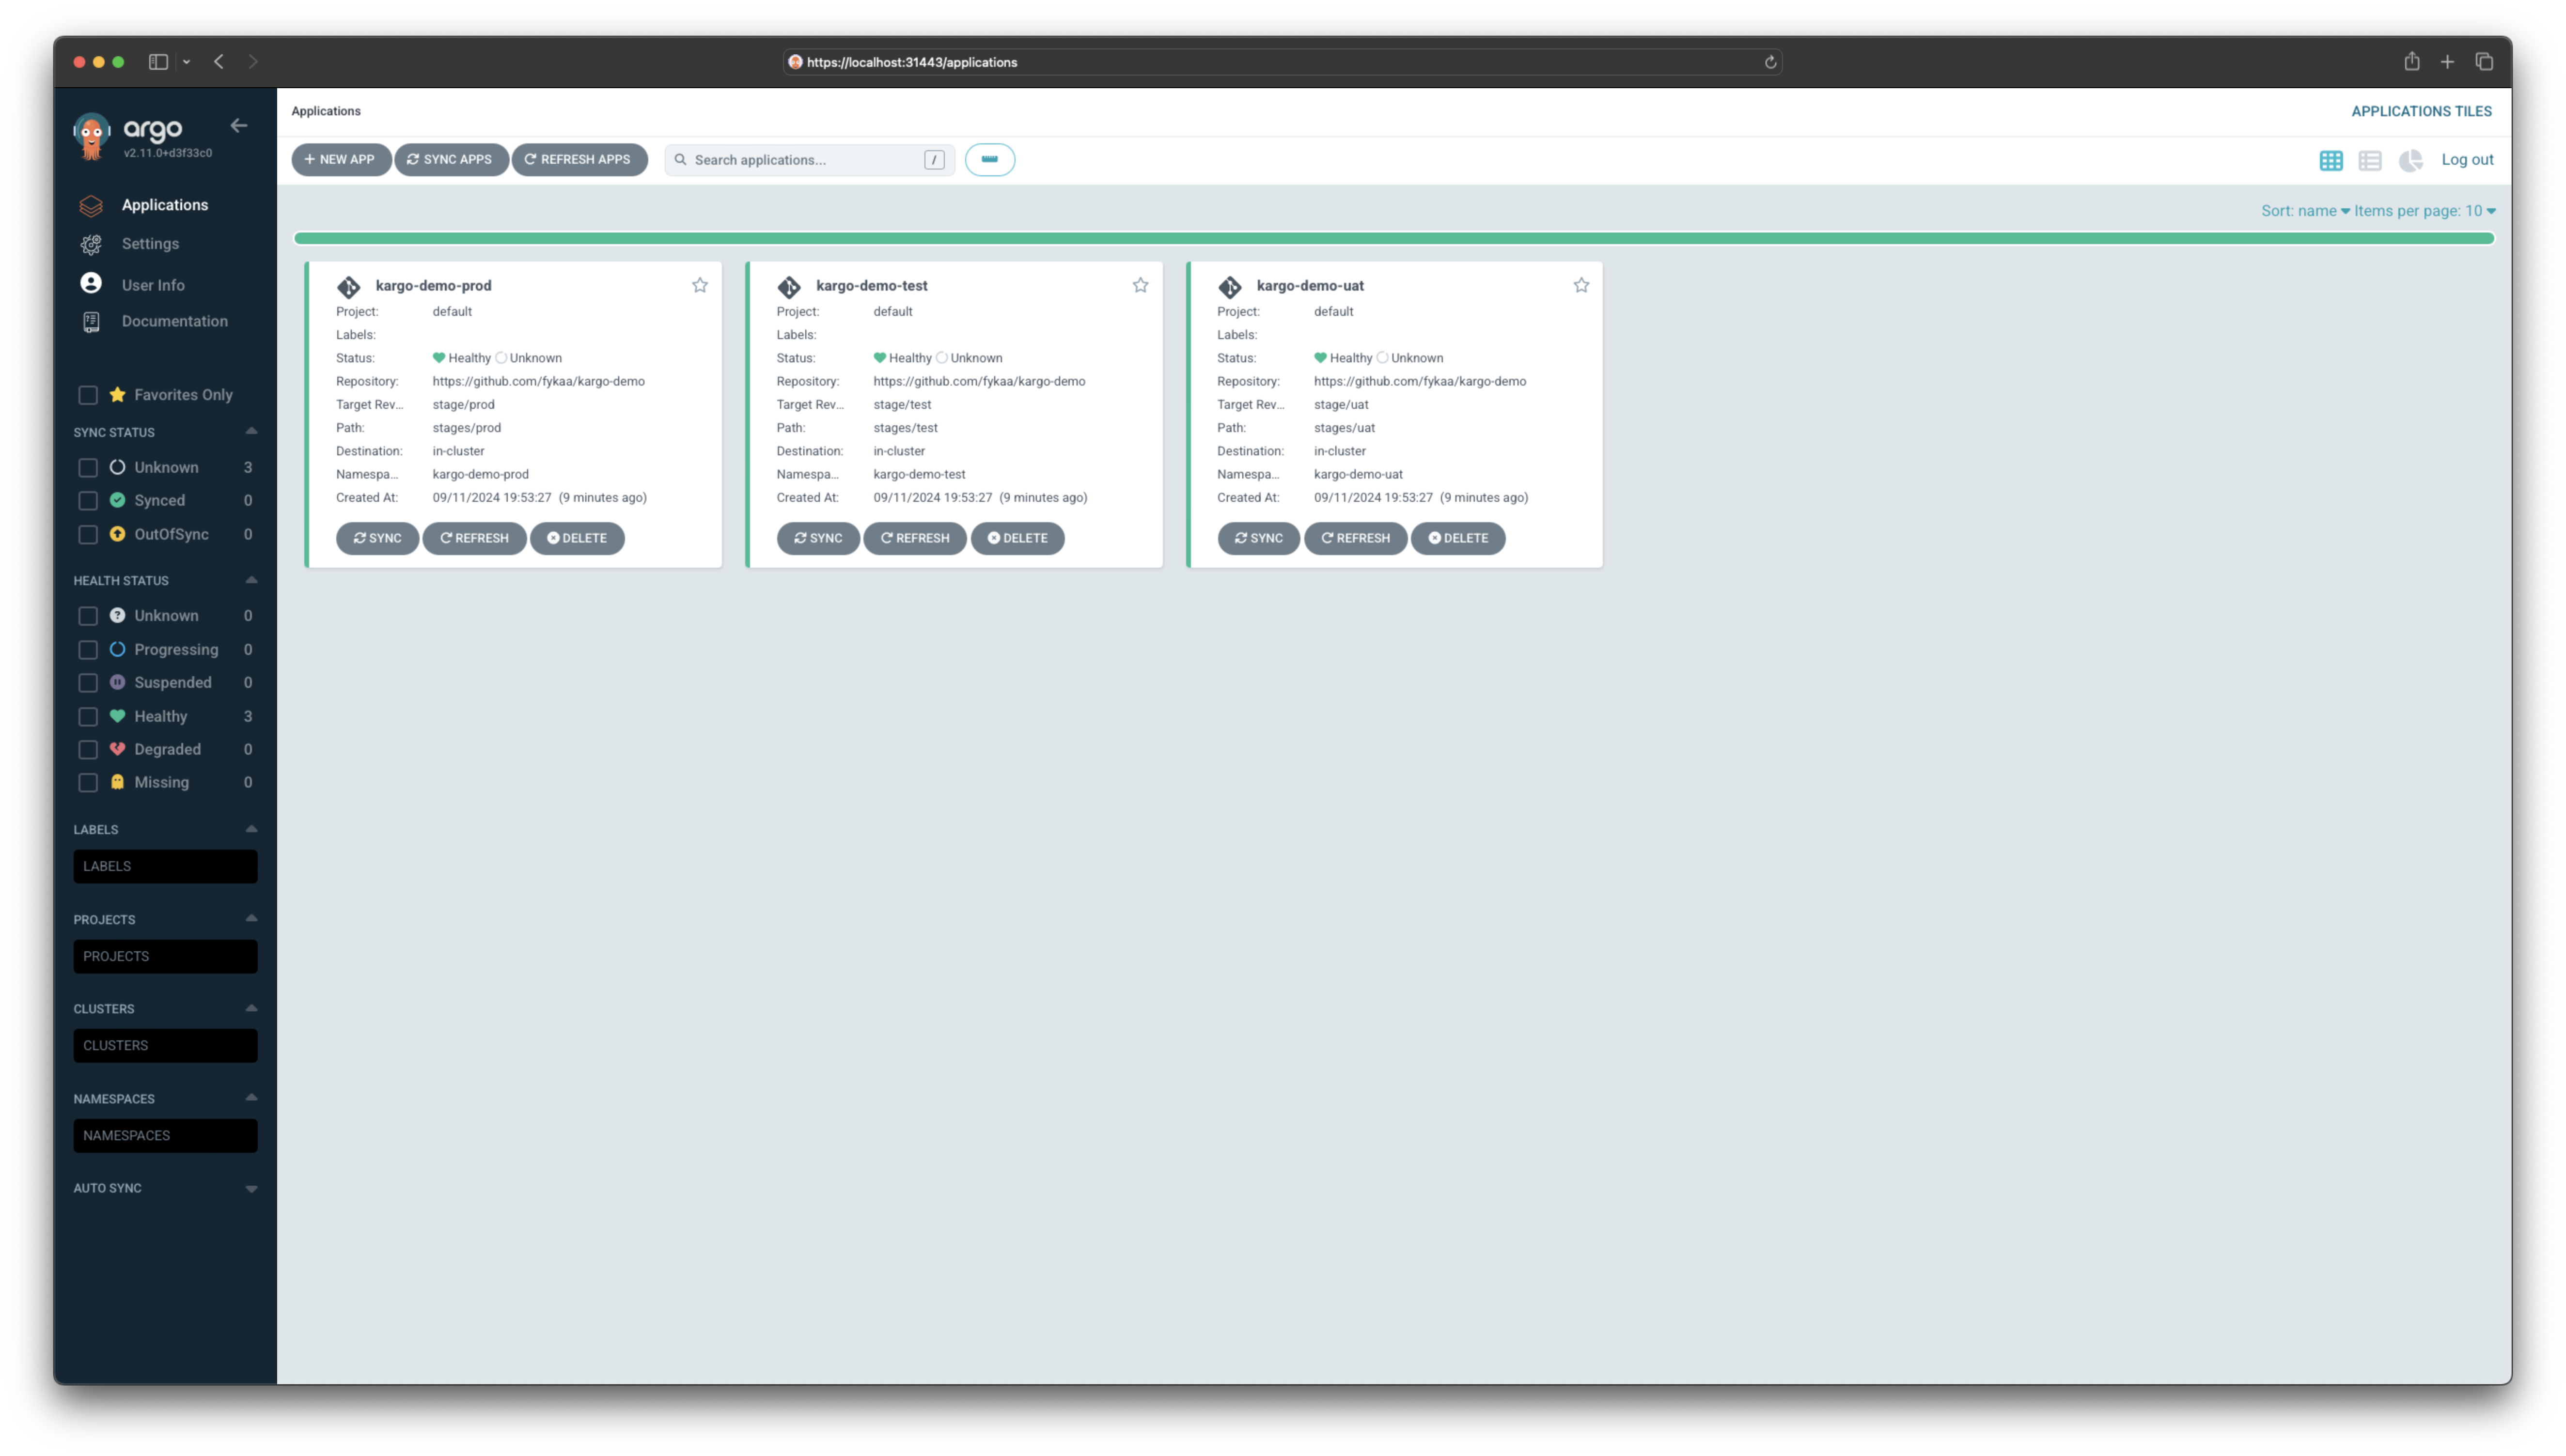
The Argo CD dashboard will be accessible at localhost:31443.
The username and password are both
admin. -
The Kargo dashboard will be accessible at localhost:31444.
The admin password is
admin. -
You can safely ignore all cert errors for both of the above.
Create a GitOps Repository
Let's begin by creating a repository on GitHub to house variations of our application manifests for three different stages of a sample application: test, UAT, and production.
-
Visit https://github.com/akuity/kargo-demo and fork the repository into your own GitHub account.
-
You can explore the repository and see that the
mainbranch contains common configuration in abase/directory as well as stage-specific overlays in paths of the formstages/<stage name>/. -
We'll be using it later, so save the location of your GitOps repository in an environment variable:
export GITOPS_REPO_URL=<your repo URL, starting with https://>
Create Argo CD Application Resources
In this step, we will use an Argo CD ApplicationSet resource to create and
manage three Argo CD Application resources that deploy the sample application
at three different stages of its lifecycle, with three slightly different
configurations, to three different namespaces in our local cluster:
cat <<EOF | kubectl apply -f -
apiVersion: argoproj.io/v1alpha1
kind: ApplicationSet
metadata:
  name: kargo-demo
  namespace: argocd
spec:
  generators:
  - list:
      elements:
      - stage: test
      - stage: uat
      - stage: prod
  template:
    metadata:
      name: kargo-demo-{{stage}}
      annotations:
        kargo.akuity.io/authorized-stage: kargo-demo:{{stage}}
    spec:
      project: default
      source:
        repoURL: ${GITOPS_REPO_URL}
        targetRevision: stage/{{stage}}
        path: .
      destination:
        server: https://kubernetes.default.svc
        namespace: kargo-demo-{{stage}}
      syncPolicy:
        syncOptions:
        - CreateNamespace=true
EOF
If you visit your Argo CD dashboard, you will notice
all three Argo CD Applications have not yet synced because they're not
configured to do so automatically, and in fact, the branches referenced by their
targetRevision fields do not even exist yet.
Your First Kargo Project
Up to this point, we haven't done anything with Kargo -- in fact everything we've done thus far should be familiar to anyone who's already using Argo CD and Kustomize. Now it's time to see what Kargo can do!
To get started, you will need a GitHub personal access token with adequate permissions to read from and write to the repository you forked in the previous section.
-
Save your GitHub handle and your personal access token in environment variables:
export GITHUB_USERNAME=<your github handle>
export GITHUB_PAT=<your personal access token> -
Next, we'll create several Kargo resources:
-
A
Project, which, when reconciled, will effect all boilerplate project initialization, including the creation of a specially-labeledNamespacewith the same name as theProject -
A
Secretcontaining credentials for our GitOps repository -
A
Warehousethat subscribes to a container image repository -
Three
Stageresources --test,uat, andprod
Although we will use Kargo's UI throughout most of this quickstart, with the amount of configuration we're about to create, it is easiest to do it declaratively using either
kubectlor thekargoCLI.infoFor demo purposes, using
kubectlis the quickest way to declaratively define your firstProject. ThekargoCLI, however, does offer Kargo-specific functionality, and for Kargo users who lack direct access to the underlying cluster, it also offers authentication via OpenID Connect. You might consider choosing this option below if you wish to become more familiar with it.- Using kubectl
- Using the Kargo CLI
To create Kargo resources, use the following command:
cat <<EOF | kubectl apply -f -
apiVersion: kargo.akuity.io/v1alpha1
kind: Project
metadata:
  name: kargo-demo
---
apiVersion: v1
kind: Secret
type: Opaque
metadata:
  name: kargo-demo-repo
  namespace: kargo-demo
  labels:
    kargo.akuity.io/cred-type: git
stringData:
  repoURL: ${GITOPS_REPO_URL}
  username: ${GITHUB_USERNAME}
  password: ${GITHUB_PAT}
---
apiVersion: kargo.akuity.io/v1alpha1
kind: Warehouse
metadata:
  name: kargo-demo
  namespace: kargo-demo
spec:
  subscriptions:
  - image:
      repoURL: public.ecr.aws/nginx/nginx
      constraint: ^1.26.0
      discoveryLimit: 5
---
apiVersion: kargo.akuity.io/v1alpha1
kind: PromotionTask
metadata:
  name: demo-promo-process
  namespace: kargo-demo
spec:
  vars:
  - name: gitopsRepo
    value: ${GITOPS_REPO_URL}
  - name: imageRepo
    value: public.ecr.aws/nginx/nginx
  steps:
  - uses: git-clone
    config:
      repoURL: \${{ vars.gitopsRepo }}
      checkout:
      - branch: main
        path: ./src
      - branch: stage/\${{ ctx.stage }}
        create: true
        path: ./out
  - uses: git-clear
    config:
      path: ./out
  - uses: kustomize-set-image
    as: update
    config:
      path: ./src/base
      images:
      - image: \${{ vars.imageRepo }}
        tag: \${{ imageFrom(vars.imageRepo).Tag }}
  - uses: kustomize-build
    config:
      path: ./src/stages/\${{ ctx.stage }}
      outPath: ./out
  - uses: git-commit
    as: commit
    config:
      path: ./out
      message: \${{ task.outputs.update.commitMessage }}
  - uses: git-push
    config:
      path: ./out
  - uses: argocd-update
    config:
      apps:
      - name: kargo-demo-\${{ ctx.stage }}
        sources:
        - repoURL: \${{ vars.gitopsRepo }}
          desiredRevision: \${{ task.outputs.commit.commit }}
---
apiVersion: kargo.akuity.io/v1alpha1
kind: Stage
metadata:
  name: test
  namespace: kargo-demo
spec:
  requestedFreight:
  - origin:
      kind: Warehouse
      name: kargo-demo
    sources:
      direct: true
  promotionTemplate:
    spec:
      steps:
      - task:
          name: demo-promo-process
        as: promo-process
---
apiVersion: kargo.akuity.io/v1alpha1
kind: Stage
metadata:
  name: uat
  namespace: kargo-demo
spec:
  requestedFreight:
  - origin:
      kind: Warehouse
      name: kargo-demo
    sources:
      stages:
      - test
  promotionTemplate:
    spec:
      steps:
      - task:
          name: demo-promo-process
        as: promo-process
---
apiVersion: kargo.akuity.io/v1alpha1
kind: Stage
metadata:
  name: prod
  namespace: kargo-demo
spec:
  requestedFreight:
  - origin:
      kind: Warehouse
      name: kargo-demo
    sources:
      stages:
      - uat
  promotionTemplate:
    spec:
      steps:
      - task:
          name: demo-promo-process
        as: promo-process
EOF
Download the Kargo CLI for your operating system and CPU architecture from the Kargo Dashboard's Downloads page:

Rename the downloaded binary to
kargo(orkargo.exefor Windows) and move it to a location in your file system that is included in the value of yourPATHenvironment variable.Log in:
kargo login https://localhost:31444 \
  --admin \
  --password admin \
  --insecure-skip-tls-verify
To create Kargo resources, use the following command:
cat <<EOF | kargo apply -f -
apiVersion: kargo.akuity.io/v1alpha1
kind: Project
metadata:
  name: kargo-demo
---
apiVersion: v1
kind: Secret
type: Opaque
metadata:
  name: kargo-demo-repo
  namespace: kargo-demo
  labels:
    kargo.akuity.io/cred-type: git
stringData:
  repoURL: ${GITOPS_REPO_URL}
  username: ${GITHUB_USERNAME}
  password: ${GITHUB_PAT}
---
apiVersion: kargo.akuity.io/v1alpha1
kind: Warehouse
metadata:
  name: kargo-demo
  namespace: kargo-demo
spec:
  subscriptions:
  - image:
      repoURL: public.ecr.aws/nginx/nginx
      constraint: ^1.26.0
      discoveryLimit: 5
---
apiVersion: kargo.akuity.io/v1alpha1
kind: PromotionTask
metadata:
  name: demo-promo-process
  namespace: kargo-demo
spec:
  vars:
  - name: gitopsRepo
    value: ${GITOPS_REPO_URL}
  - name: imageRepo
    value: public.ecr.aws/nginx/nginx
  steps:
  - uses: git-clone
    config:
      repoURL: \${{ vars.gitopsRepo }}
      checkout:
      - branch: main
        path: ./src
      - branch: stage/\${{ ctx.stage }}
        create: true
        path: ./out
  - uses: git-clear
    config:
      path: ./out
  - uses: kustomize-set-image
    as: update
    config:
      path: ./src/base
      images:
      - image: \${{ vars.imageRepo }}
        tag: \${{ imageFrom(vars.imageRepo).Tag }}
  - uses: kustomize-build
    config:
      path: ./src/stages/\${{ ctx.stage }}
      outPath: ./out
  - uses: git-commit
    as: commit
    config:
      path: ./out
      message: \${{ task.outputs.update.commitMessage }}
  - uses: git-push
    config:
      path: ./out
  - uses: argocd-update
    config:
      apps:
      - name: kargo-demo-\${{ ctx.stage }}
        sources:
        - repoURL: \${{ vars.gitopsRepo }}
          desiredRevision: \${{ task.outputs.commit.commit }}
---
apiVersion: kargo.akuity.io/v1alpha1
kind: Stage
metadata:
  name: test
  namespace: kargo-demo
spec:
  requestedFreight:
  - origin:
      kind: Warehouse
      name: kargo-demo
    sources:
      direct: true
  promotionTemplate:
    spec:
      steps:
      - task:
          name: demo-promo-process
        as: promo-process
---
apiVersion: kargo.akuity.io/v1alpha1
kind: Stage
metadata:
  name: uat
  namespace: kargo-demo
spec:
  requestedFreight:
  - origin:
      kind: Warehouse
      name: kargo-demo
    sources:
      stages:
      - test
  promotionTemplate:
    spec:
      steps:
      - task:
          name: demo-promo-process
        as: promo-process
---
apiVersion: kargo.akuity.io/v1alpha1
kind: Stage
metadata:
  name: prod
  namespace: kargo-demo
spec:
  requestedFreight:
  - origin:
      kind: Warehouse
      name: kargo-demo
    sources:
      stages:
      - uat
  promotionTemplate:
    spec:
      steps:
      - task:
          name: demo-promo-process
        as: promo-process
EOF -
-
Navigate to the Kargo Dashboard:
-
Log in using the password
admin.This will take you to a list of
Projects. It currently includes only the one created in the previous step.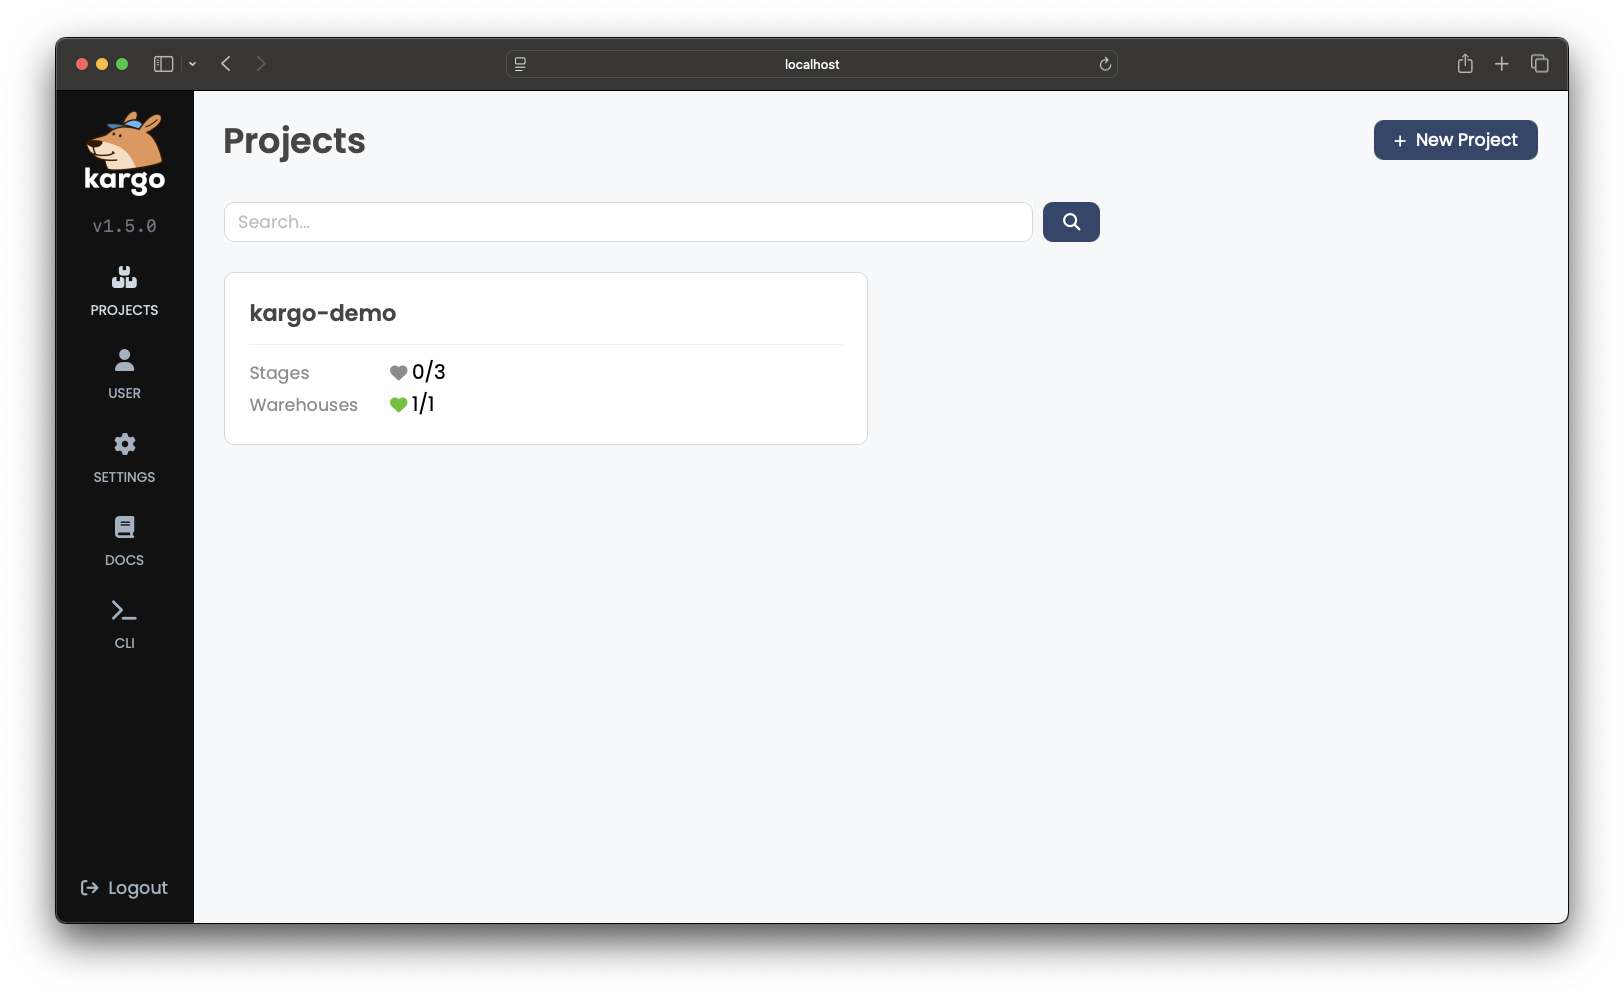
-
Select kargo-demo:
Here you can see a detailed overview of the
Projectwe previously created. It includes:-
An interactive, visual representation of your pipeline, composed of:
- A container image repository.
- A
Warehousethat discovers new images as they are pushed to the repository. - Three
Stages representing distinct instances of our demo application.
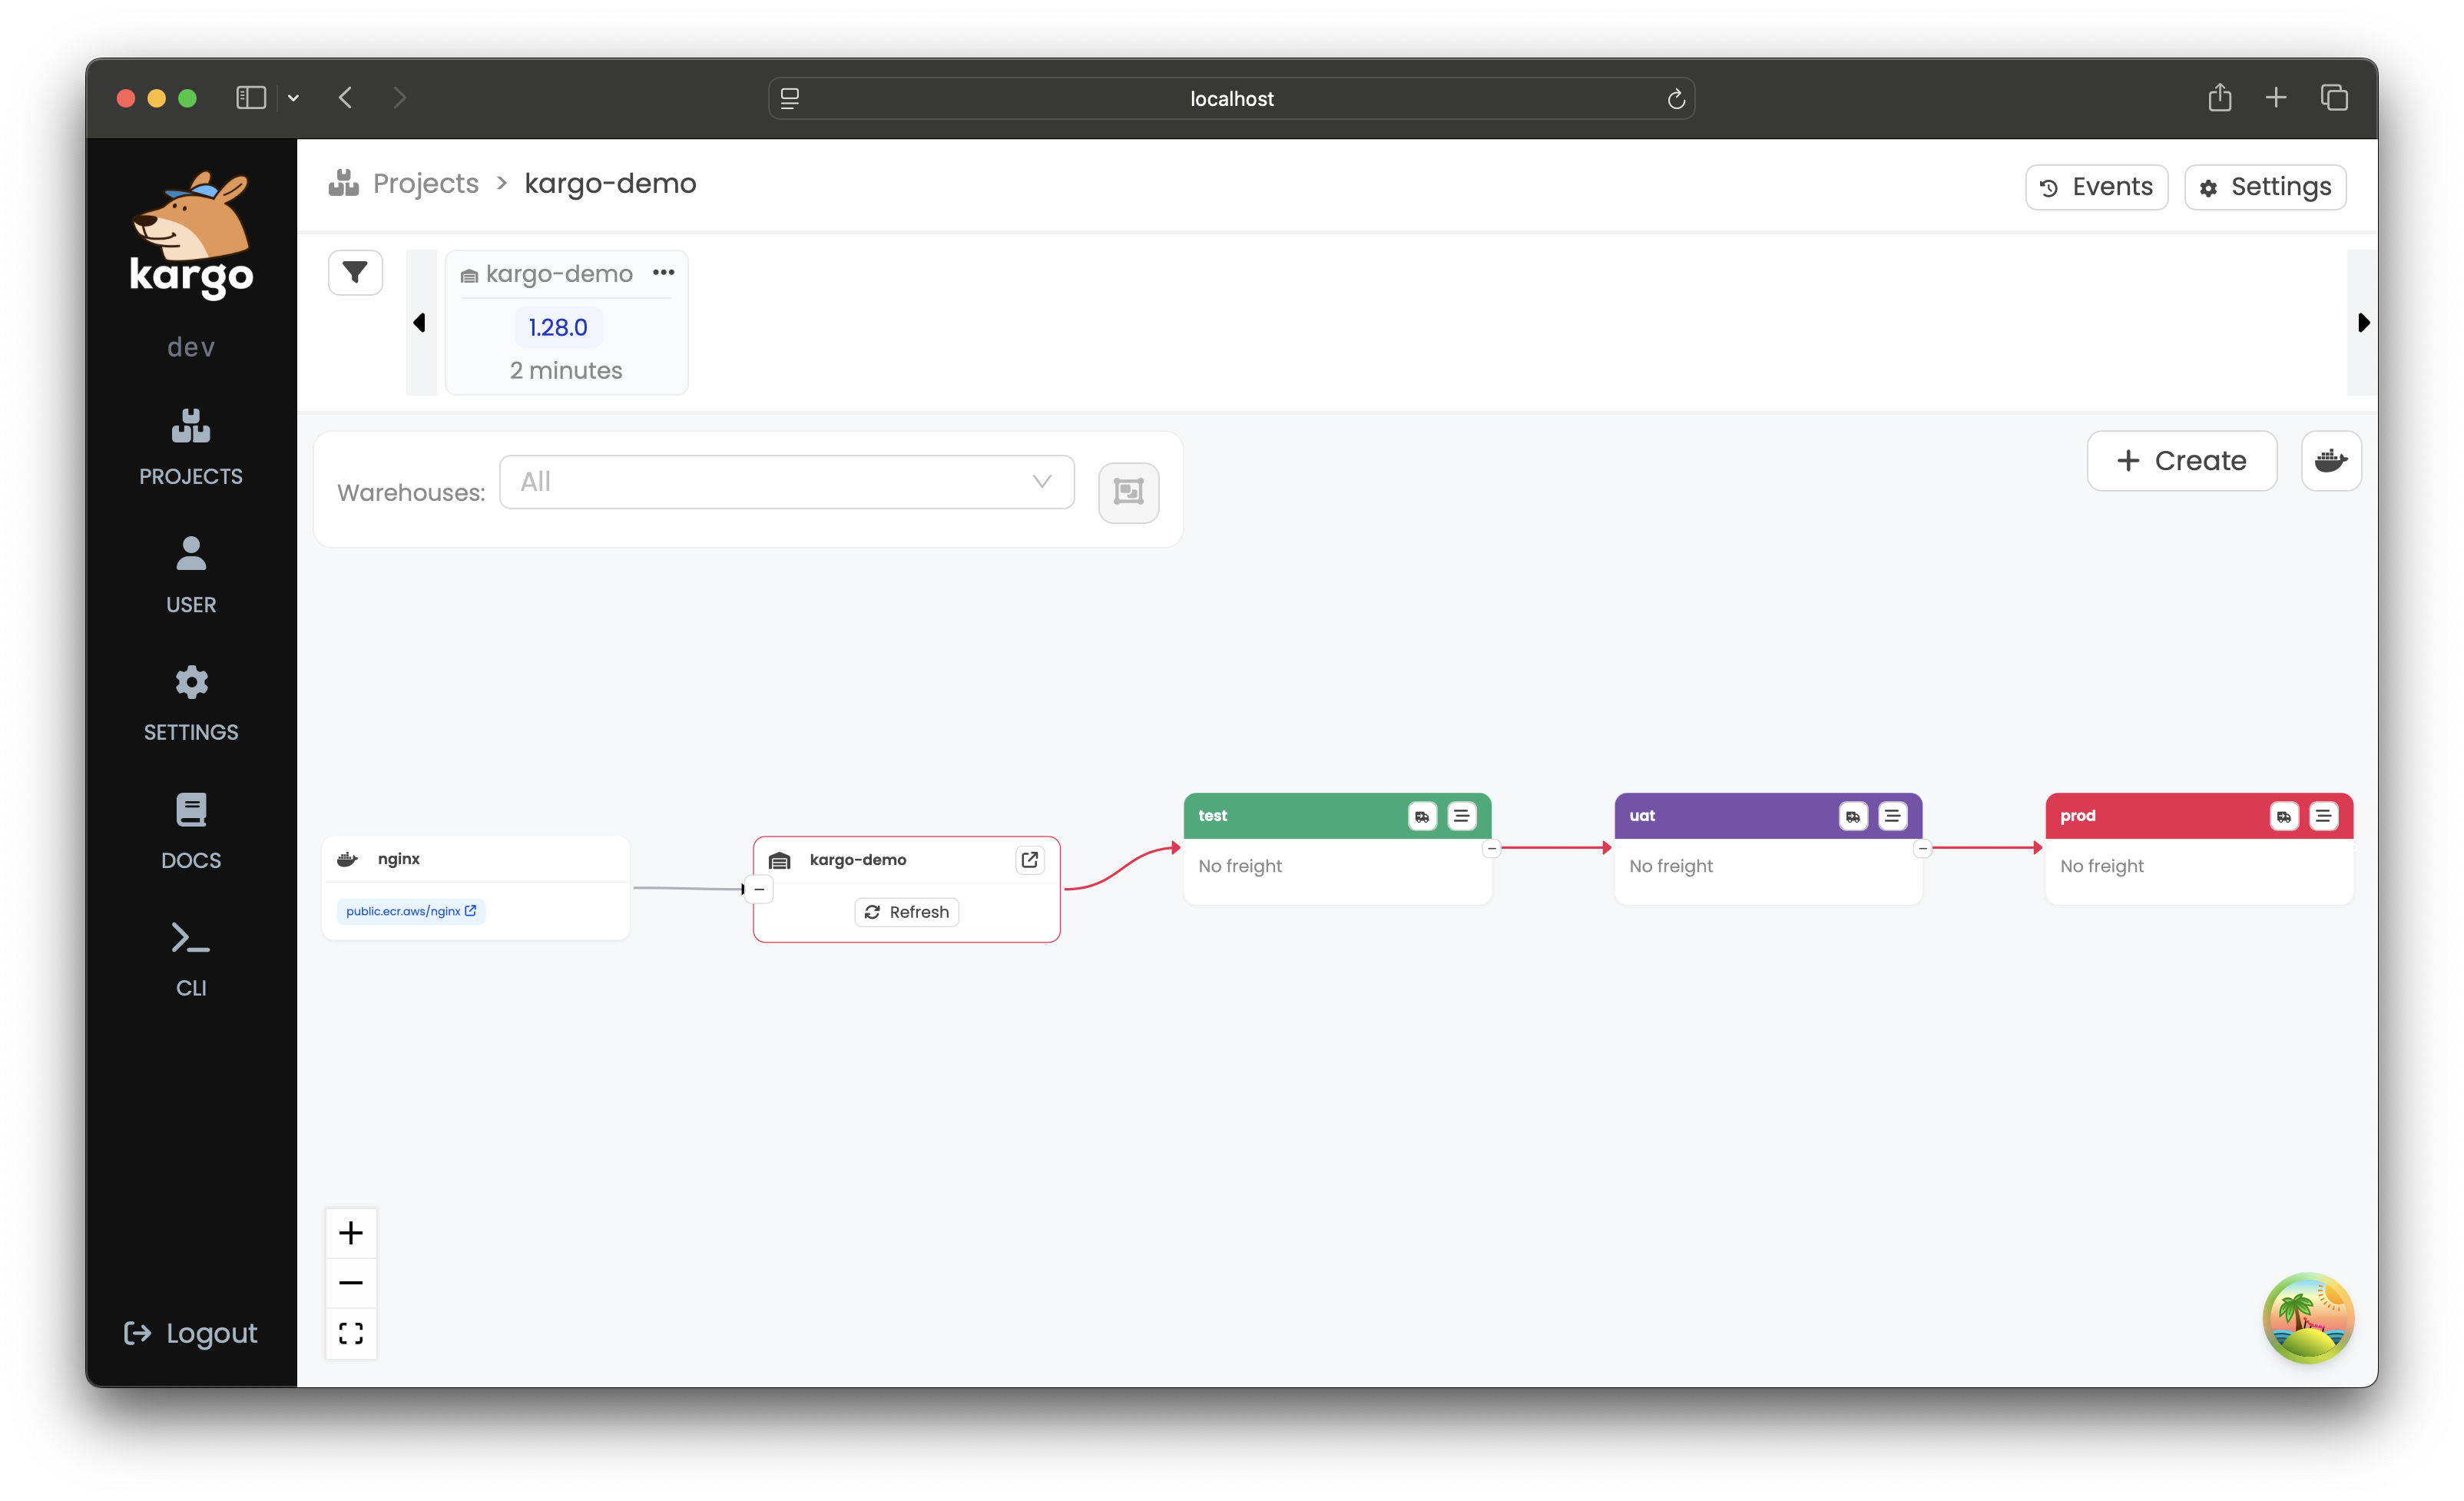
-
An interactive timeline with
Freightordered chronologically, with newerFreightto the left and olderFreightto the right.
-
-
-
After a few seconds, a node representing a piece of
Freightshould appear in the freight timeline, if it isn't there already.infoFreightis a set of references to one or more versioned artifacts, which may include:-
Container images (from image repositories)
-
Kubernetes manifests (from Git repositories)
-
Helm charts (from chart repositories)
This introductory example has
Freightthat references only a specific version of thepublic.ecr.aws/nginx/nginxcontainer image. -
Your First Promotion
-
To promote
Freightto thetestStage, click the truck icon in the header of that node and then select Promote: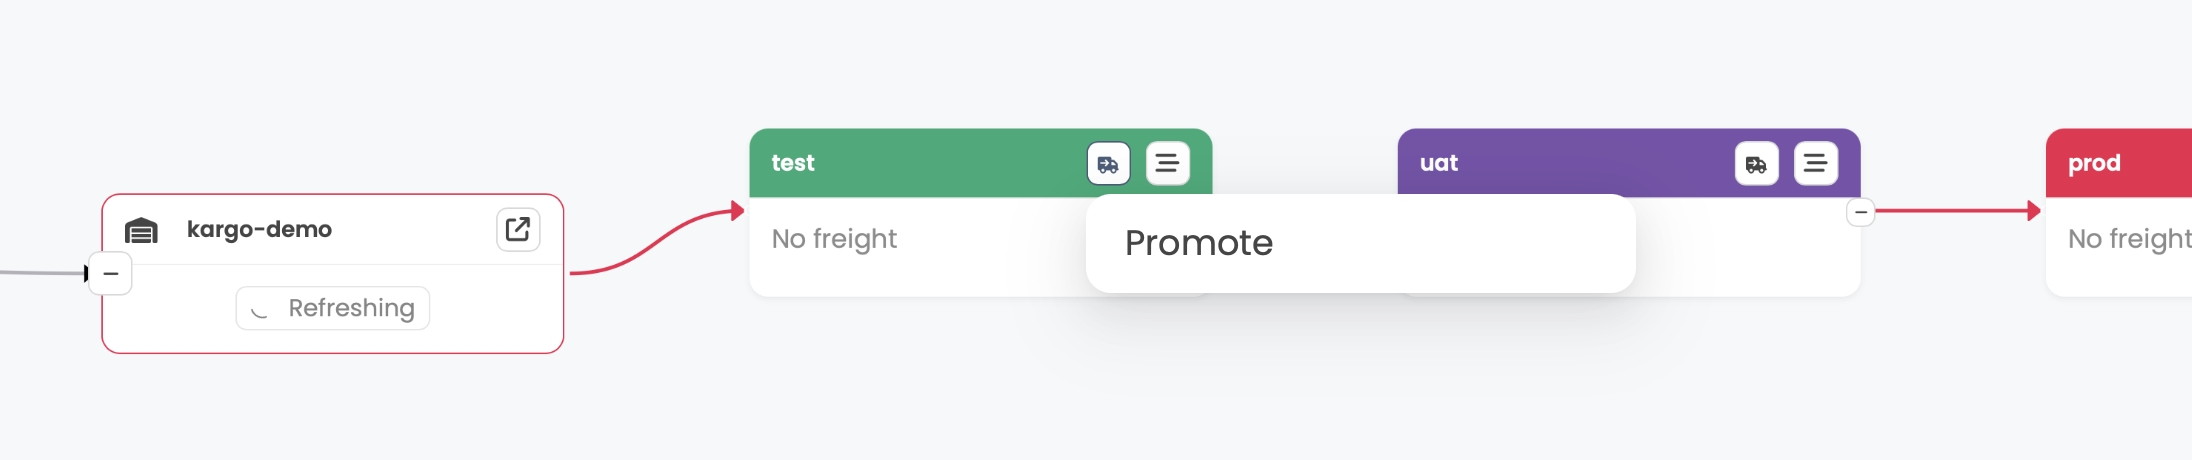
-
From the timeline at the top of the screen, select the
Freightyou'd like to promote into thetestStageby clicking Select:
-
Confirm the action by clicking Promote:
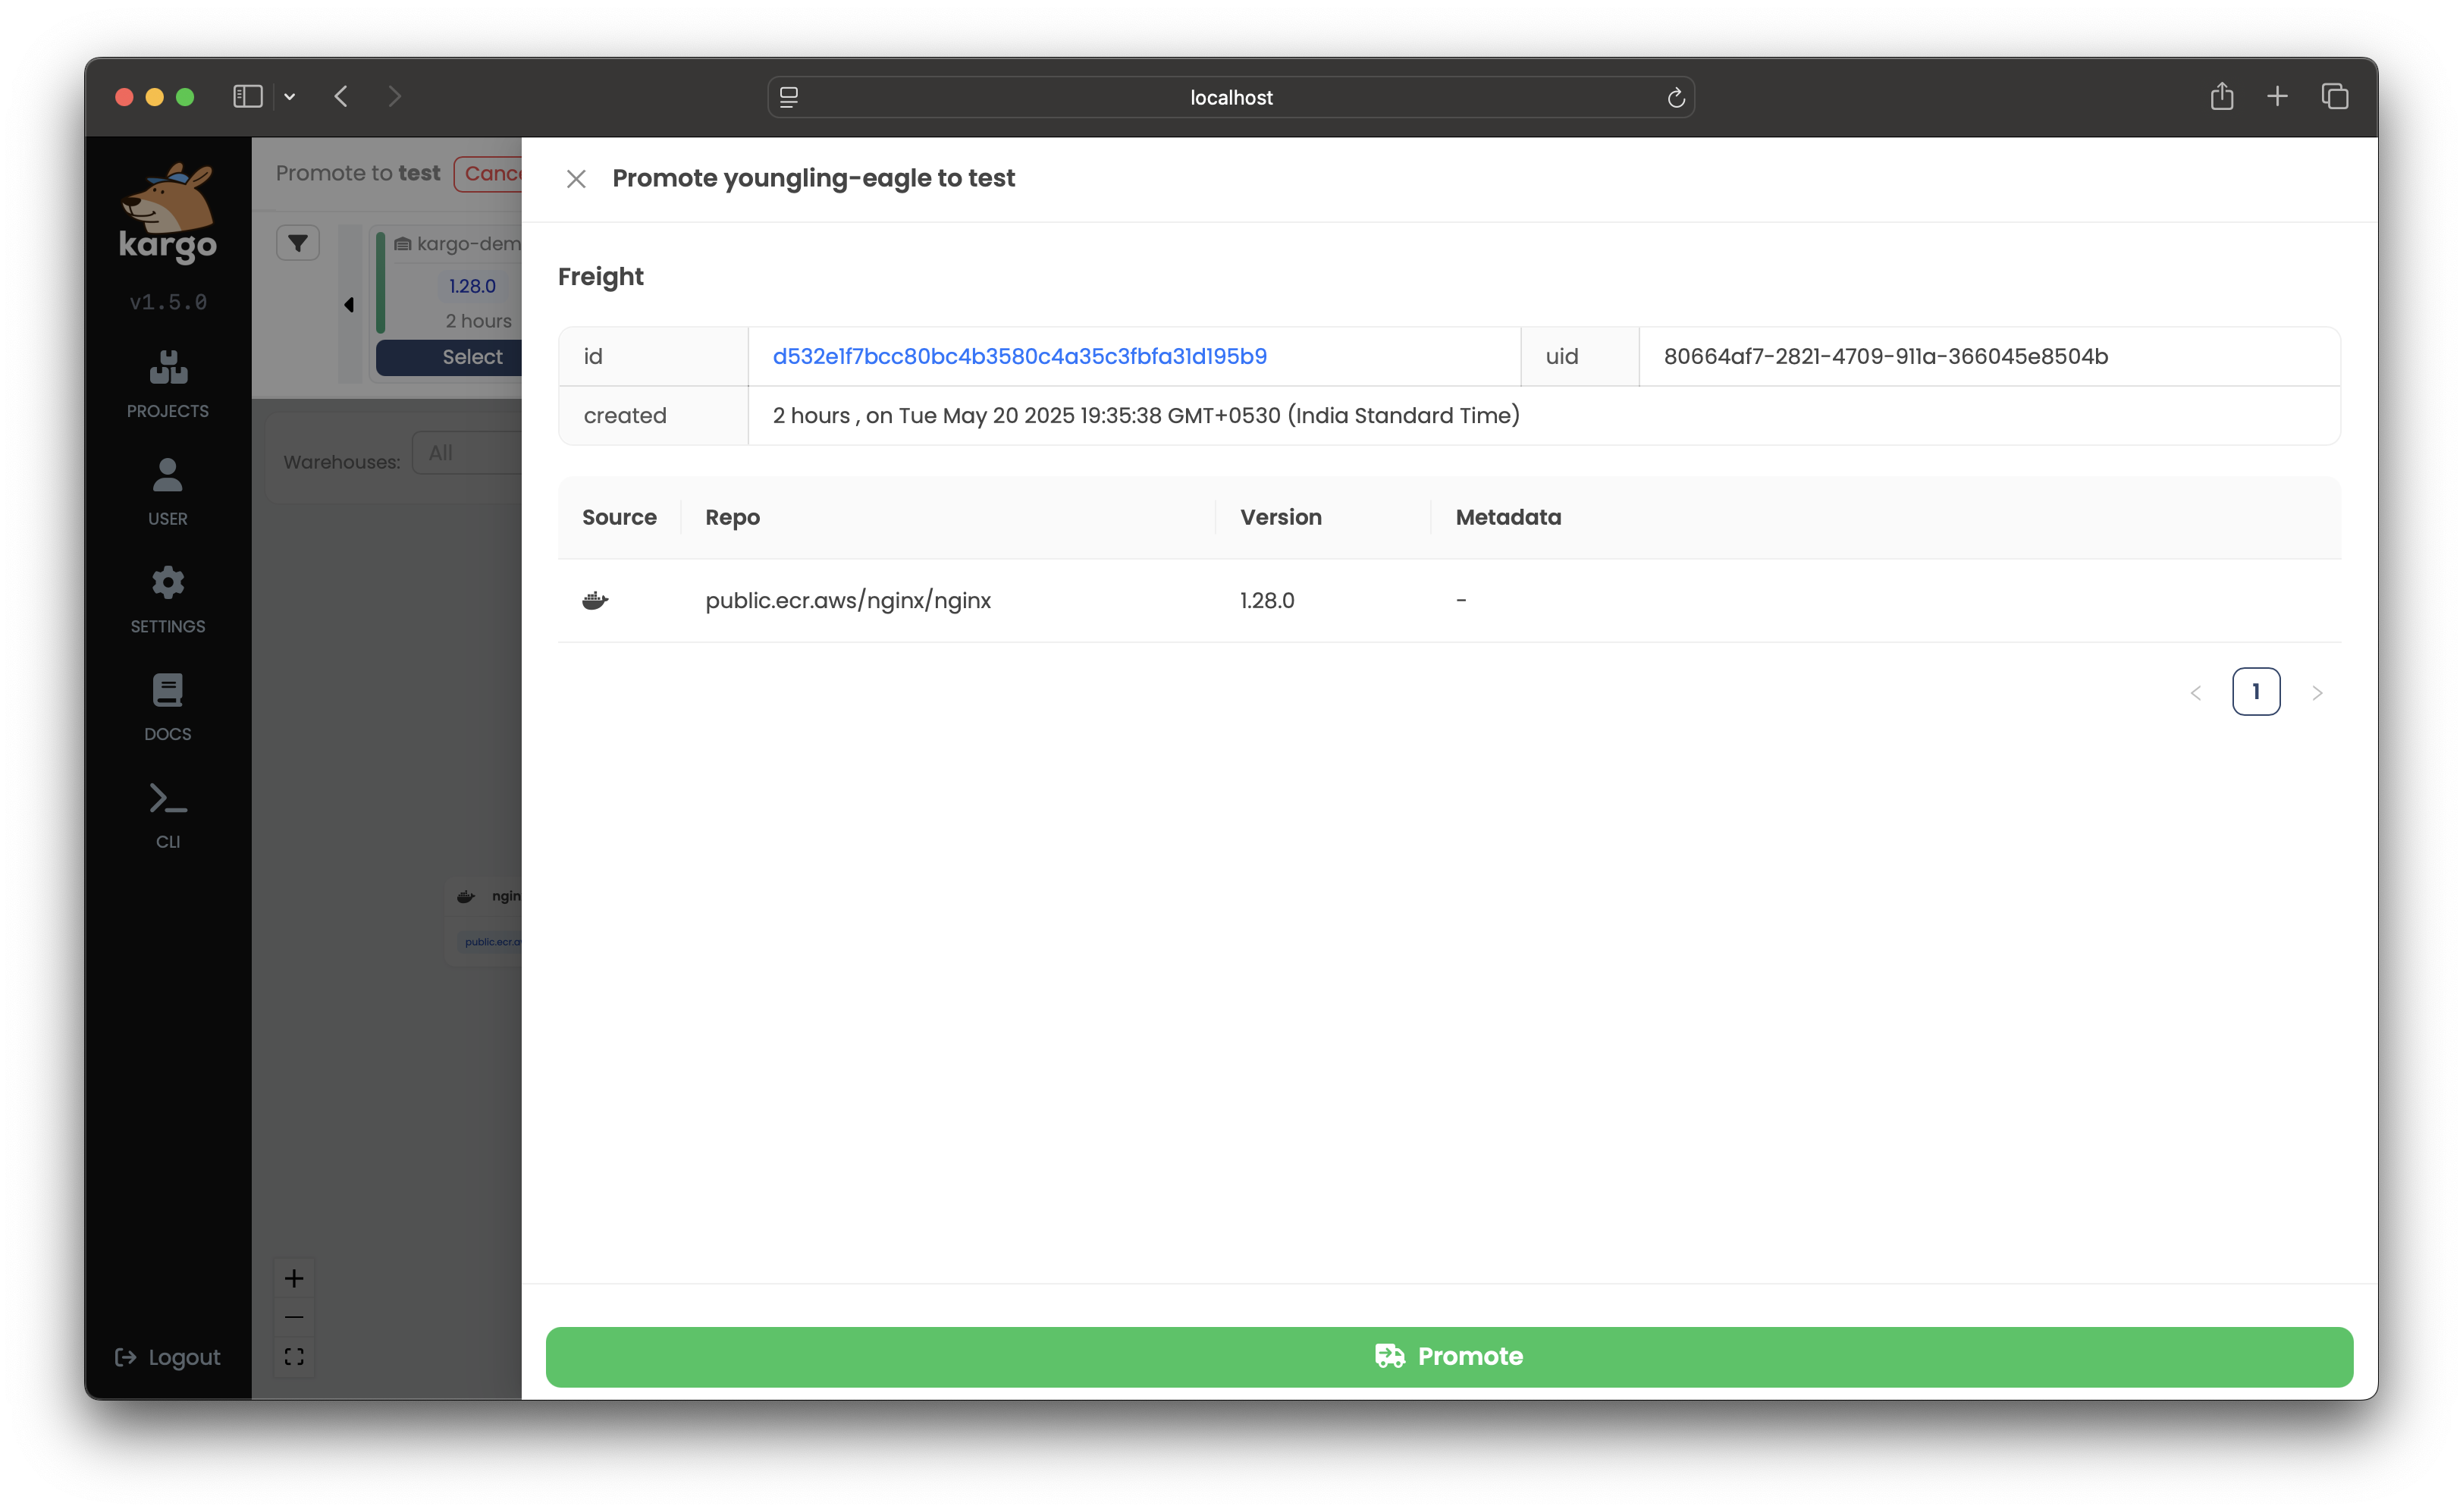
A summary of the
Promotionwill pop up and will be updated in real-time as the steps of the promotion process complete. Once they have all completed, thePromotion's status will change to Succeeded: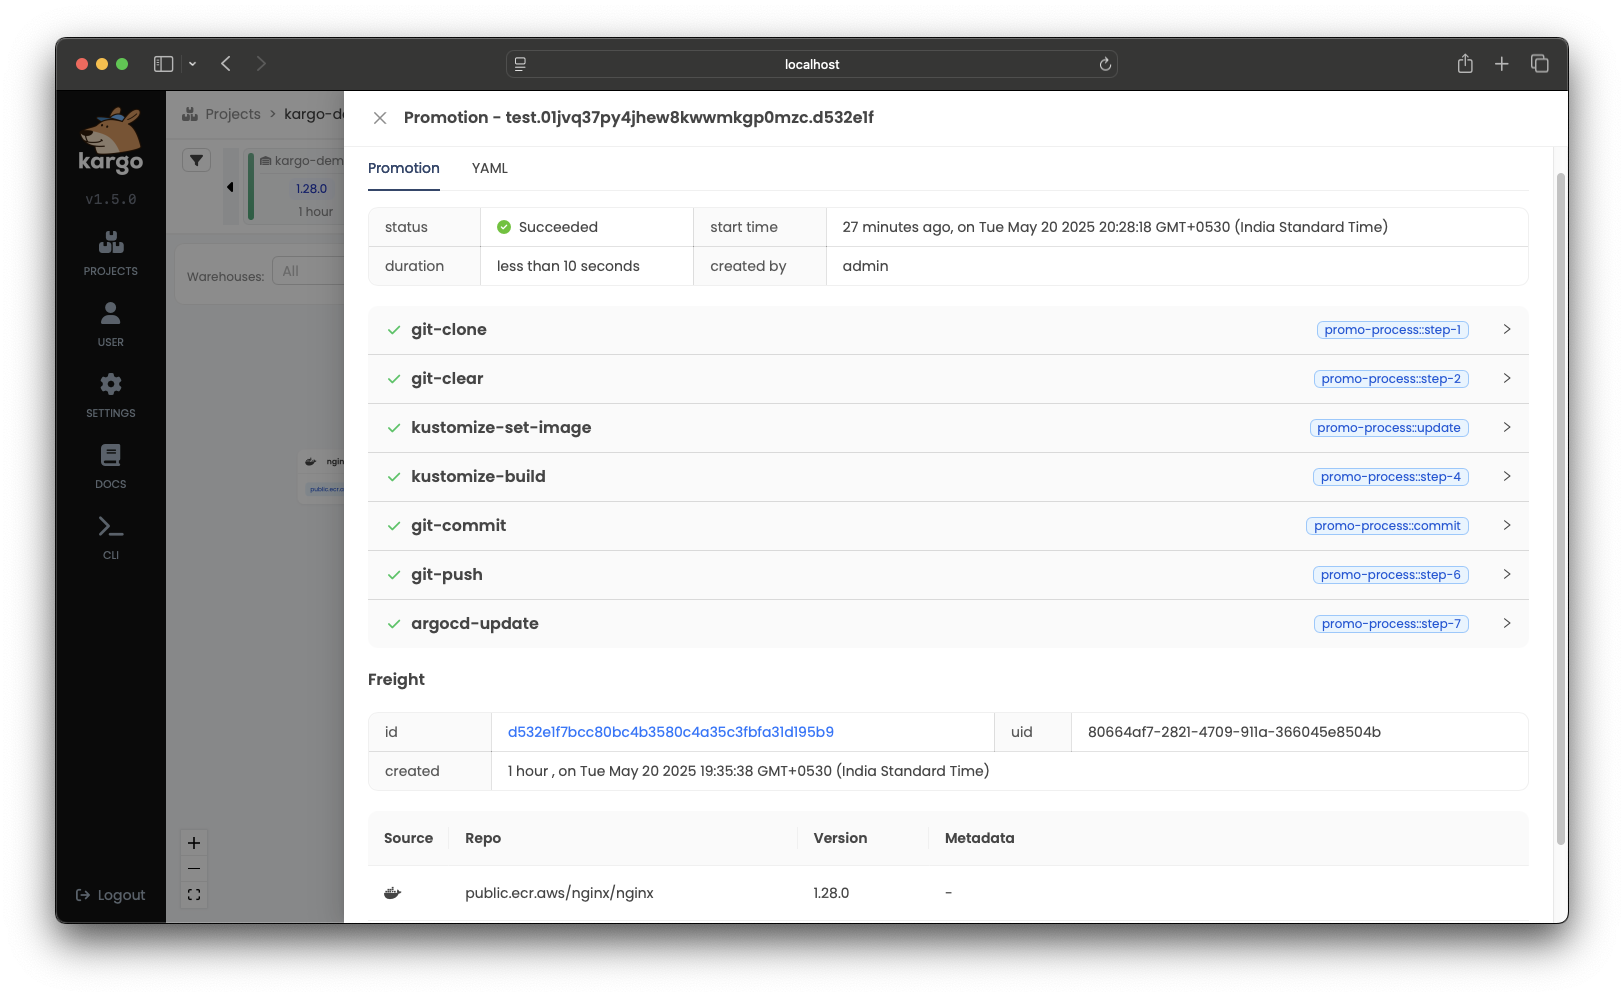
You will also notice the freight timeline has been automatically updated. Every piece of
Freightin the timeline is color-coded to indicate whichStages (if any) are actively using it. You will see the one piece ofFreightcurrently in the timeline is marked with the same color as thetestStage's node in the pipeline. This indicates this piece ofFreightis currently used by thatStage.
After Your First Promotion
Following your first promotion, Kargo will periodically execute a health check
on the test Stage. After the first successful health check, the test
Stage's healthy state will be reflected by a heart icon on its node in the
pipeline.
Now is a good time to explore the UI some more.
-
To see more information about the
testStage, click the staggered bars icon in the header of theStage's node in the pipeline: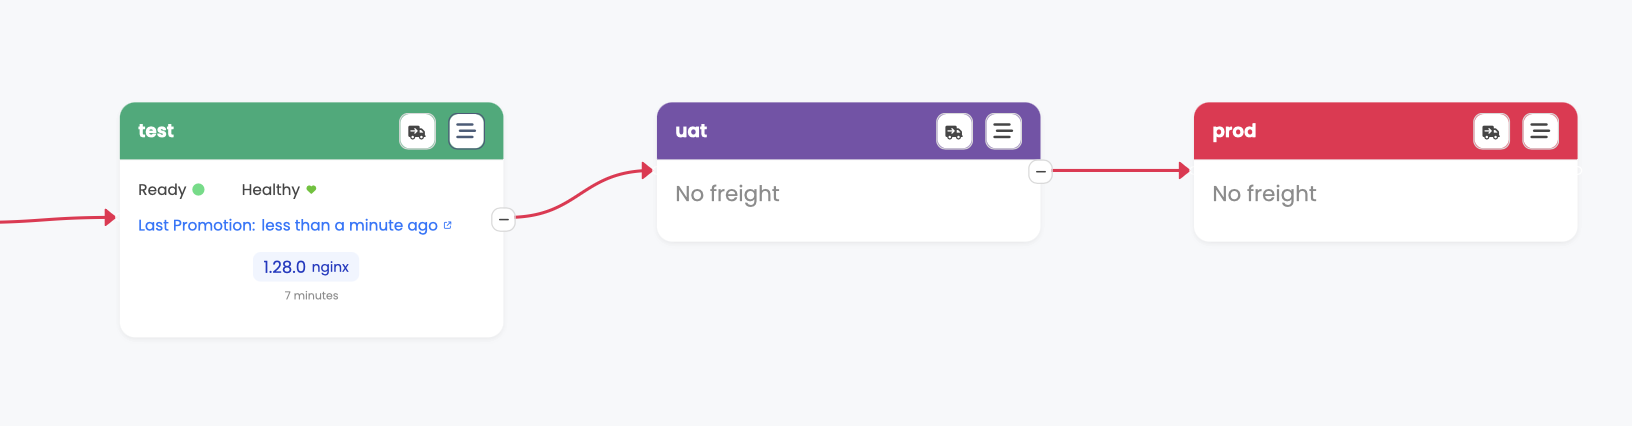
This view provides a comprehensive overview of the
Stages health, currentFreight, histories ofPromotions and ofFreightpreviously promoted to theStage, and more: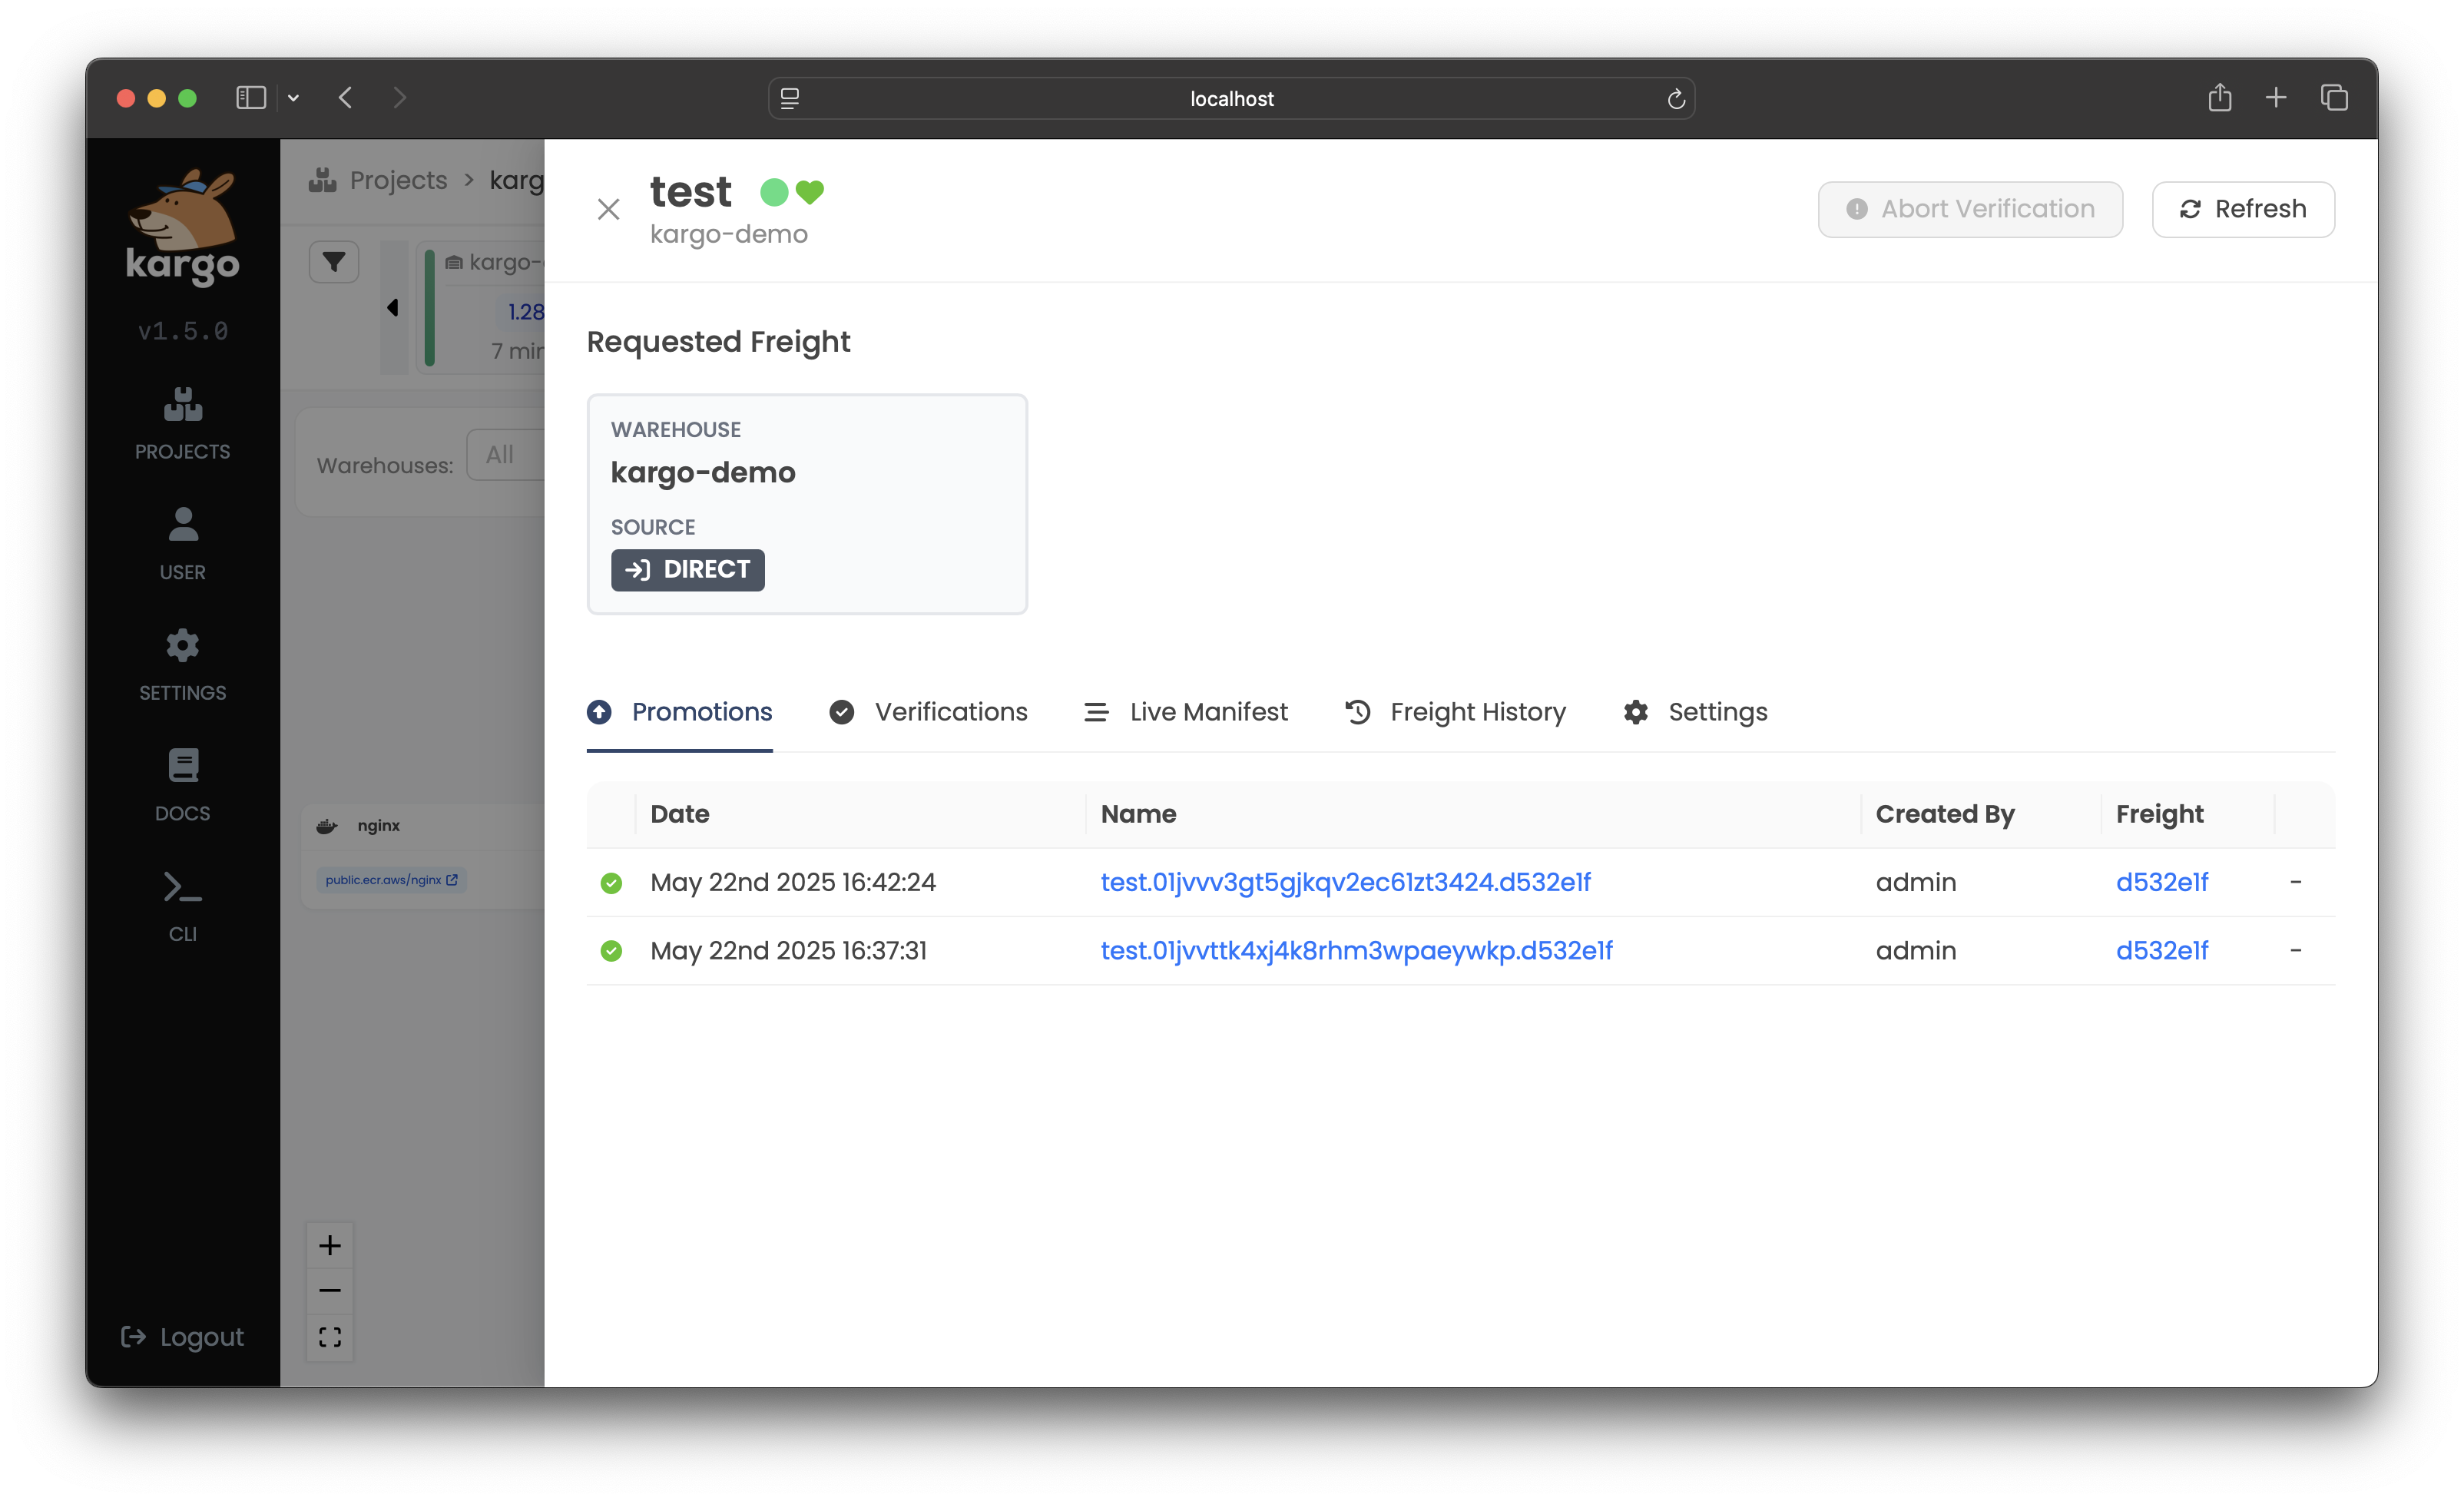
-
To see more information about the one piece of
Freight, click anywhere on its node in the timeline to open a detailed view:
Here, you can see that (by virtue of the
testStagehaving achieved a healthy state) theFreightis now verified in thetestStage, which makes it available for promotion to the nextStagedownstream fromtest,uat.noteAlthough this simple example does not demonstrate it, it is also possible to perform more extensive verification of the
Freightin anyStageusing user-defined processes.
Behind the Scenes
So what has Kargo done behind the scenes?
Visiting our fork of https://github.com/akuity/kargo-demo, we will see that
Kargo has recently created a stage/test branch for us. It has taken the latest
manifests from the main branch as a starting point, run kustomize edit set image and kustomize build within the stages/test/ directory, and written
the resulting manifests to a stage-specific branch -- the same branch referenced
by the test Argo CD Application's targetRevision field.
Although not required for all uses cases, using stage-specific branches is a practice highly recommended by the Kargo team.
Promote to UAT and then Production
Unlike our test Stage, which subscribes directly to an image repository,
our uat and prod Stages both subscribe to other, upstream Stages,
thereby forming a pipeline:
uatsubscribes totestprodsubscribes touat.
We leave it as an exercise to the reader to use the dashboard to progress the
Freight from test to uat and again from uat to prod.
The uat and prod instances of our site should be accessible at:
uat: localhost:30082prod: localhost:30083
It is possible to automate promotion of new, qualified Freight for designated
Stages and also possible to used RBAC to limit who can trigger manual
promotions for each Stage, however, both these topics are beyond the scope of
this introduction.
Cleaning up
Congratulations! You've just gotten hands on with Kargo for the first time!
Now let's clean up!
- Docker Desktop
- OrbStack
- kind
- k3d
Docker Desktop supports only a single Kubernetes cluster. If you are comfortable deleting not just just Kargo-related resources, but all your workloads and data, the cluster can be reset from the Docker Desktop Dashboard.
If, instead, you wish to preserve non-Kargo-related workloads and data, you will need to manually uninstall Kargo and its prerequisites:
curl -L https://raw.githubusercontent.com/akuity/kargo/main/hack/quickstart/uninstall.sh | sh
OrbStack supports only a single Kubernetes cluster. If you are comfortable deleting not just just Kargo-related resources, but all your workloads and data, you can destroy the cluster with:
orb delete k8s
If, instead, you wish to preserve non-Kargo-related workloads and data, you will need to manually uninstall Kargo and its prerequisites:
curl -L https://raw.githubusercontent.com/akuity/kargo/main/hack/quickstart/uninstall.sh | sh
Simply destroy the cluster:
kind delete cluster --name kargo-quickstart
Simply destroy the cluster:
k3d cluster delete kargo-quickstart